Blog
Split Pillow Back Instructions

To make a split back for any square pillow, the fabric is cut into two pieces. These two pieces must be large enough to provide a generous overlap when sewn together. Adding at least 6” is a good rule of thumb. The table below provides suggested cutting instructions for popular sizes.
| Pillow Size | Cut Two Pieces |
| 16-1/2” x 16-1/2” | 16-1/2” x 11” |
| 14-1/2” x 14-1/2” | 14-1/2” x 10” |
| 12-1/2” x 12-1/2” | 12-1/2” x 9” |
Pre-Assembly
1.Place the two back pieces side by side, with the longer edges together. The inner side of each piece needs to be seamed. Fold the edge over approximately 1/4″ and then fold it over again and topstitch. By folding it over twice, the raw edges are hidden.
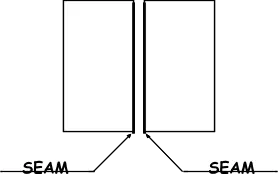
image3
2.Place the pillow front with the right side up.
Note: “Right side up” means that the front of the fabric should be facing you.
3.Line up one of the pillow back pieces with the top and bottom left-hand corners of the pillow front. Place the pillow back piece with the right side down, matching the side seam. Pin in place.

image2
4.Repeat Step 3 with the second half of the pillow back, making sure that the two finished seams lie over each other in the center of the pillow. Pin in place.
5.Sew a 1/4” seam around the four outside edges. You may also want to zigzag around the edges to help prevent fraying. You should now have an opening in the center of the back with all the outside edges sewn together.
6.You are now ready to turn the pillow right side out. Use a blunt object to poke out the corners.
Congratulations! You’ve completed your pillow!
Subscribe to our newsletter!
By submitting this form, you are consenting to receive marketing emails from: CottonNoveltyFabrics. You can revoke your consent to receive emails at any time by using the SafeUnsubscribe® link, found at the bottom of every email. Emails are serviced by Constant Contact